

WARNING: this post is not philosophy, or business, or management, or strategy. This is pure geek stuff. If this sort of thing is not your cup of coffee, skip now. Yes, it’s ok if no one in my circles finds this post the least bit useful. 😀
My laptop needs an upgrade
I’ve been using Thinkpads since my first laptop in 1999, and I’ve never regretted this choice. Not even after Lenovo laid their dirty, grubby hands on the brand. But I’ve usually opted for extended warranty for each laptop, and that’s covered me for five years. (Yes, not too many laptops get 5 years of warranty cover, even if you pay. Thinkpads do.)
But I’ve been noticing that a five-year-old Thinkpad rarely shows much signs of age. It’s always the fear of being faced with a keyboard or a screen fault and spending half the price of a new laptop to get it fixed, which makes me replace them after the warranty expires. So, this time, I just said “What the hell” and completed my sixth year this August. And then I felt, why not spend a bit of money upgrading bits of it without actually replacing it? I deserve the budget, considering I’ve saved so much by not replacing the whole machine.
So, I felt it would be cool to replace my 1 TB SSD with a 2 TB module. And while I’m at it, I might as well re-partition the drive and upgrade to the next major OS version.
My laptop
It’s a Thinkpad X280, with 16 GB RAM and non-touch screen. It came with a 512 GB SSD which I replaced with a 1 TB in 2018 within a few days of the new laptop arriving. I keep playing with photos and videos, and it’s nice to have the additional storage. The i5 CPU and 16 GB of RAM seems adequate even after six years — I don’t play games, and my compute performance hardly gets tested other than during video encoding or compiling LaTeX documents.
In my long and storied relationship with Thinkpads, the X280 is the first one which has an NVME M.2 SSD module. My previous laptop was an X230, which had a SATA bay, and I had replaced its mechanical SATA drive with an SSD SATA module. But as we all know, going SSD and then being stuck with a SATA drive is a sad compromise. So, the X280 allowed me to move to pure PCIe SSD the way God intended SSD to be.
The only thing I usually need to replace on my Thinkpads is the battery, every two years. This has continued from my earliest 380XD to my X230. With the X280, I was very surprised to see the battery last for five years, and it had degraded to just about 40-50% even after that. I decided to get the battery replaced anyway — got an aftermarket battery from Unicell of Singapore who have supplied me with all sorts of aftermarket laptop and camera batteries. They have a store in the back-lane of one of the floors of Sim Lim Square, and I went and bought a replacement across the counter last year. It’s been working perfectly.
On the OS side, I’ve been on Ubuntu for perhaps a decade or more. I stick to the LTS releases, so I upgrade my OS major number every two years. I’ve been running 18.04 LTS, then 20.04, then 22.04, on my X280. It was time I moved to 24.04. This change would coincide perfectly with my SSD upgrade.
Now I was faced with the prospect of major hardware and software surgery to get my old laptop a new OS and a new storage module. I’d have to do the following:
- Take backups of my Windows 10 partition and my Linux home directory and other areas. The WIndows backup would need to be a system image, not just a backup, so that I could restore the entire image blindly to the new SSD
- Pull out the old SSD, put in the new.
- Restore the Windows partition from the system image.
- Resize the Windows partition, take it from 100 GB to 175 or so. I will have capacity to spare.
- Install Ubuntu 24.04 LTS on the rest of the drive.
- Restore all my Linux files, install all the extra packages I like playing with.
- Test, test. test.
- Take a backup of the new system to my NAS, so that I’m back again in action and the new backup replaces the old.
The Windows 10 System Image origin story
This part starts with a spare USB drive connected to my laptop, formatted in NTFS, with more than enough free space for my Windows partition.
I booted my laptop in Windows, then went to “Settings”, and thence to “File backup”. In that pane, there is a strange section titled “Looking for an older backup?”. Below is a link titled “Go to Backup And Restore (Windows 7)”. I clicked on that link, and a new application opened up. That application had a link called “Create a system image”, which I clicked, and the system image process started. It took several minutes, and created a system image on my USB drive. I then shut down my laptop and went into screwdriver mode.
The open-heart surgery bit
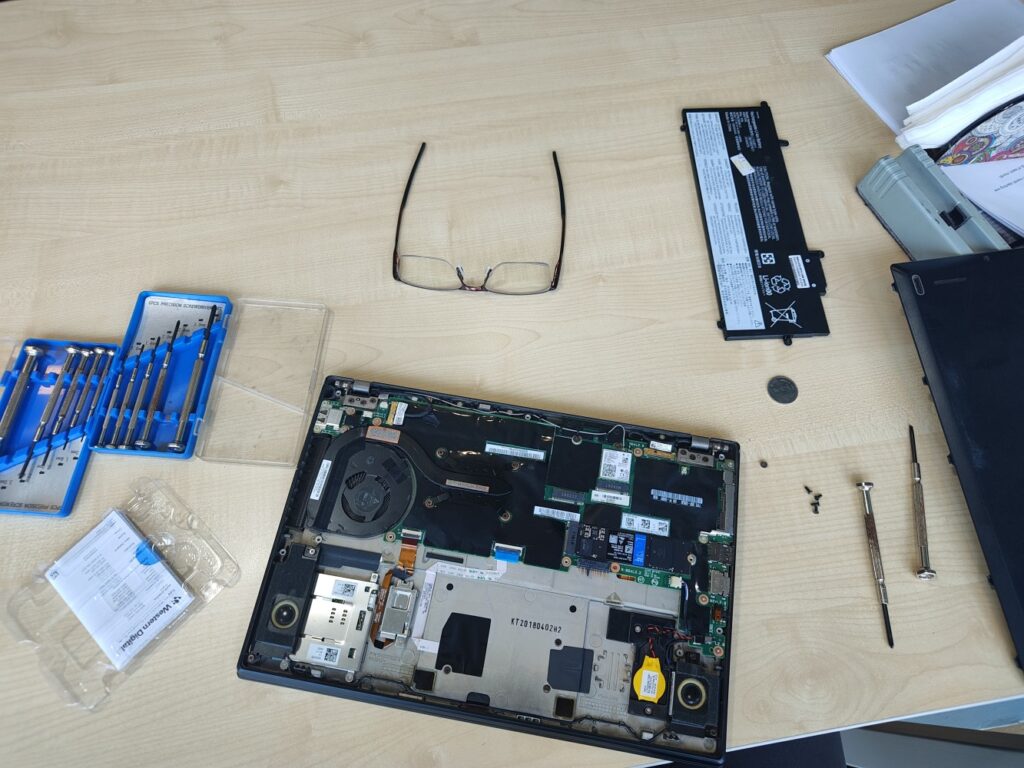
I found the right set of screwdrivers, watched some YouTube videos for X280 SSD replacement, and jumped right in one fine day at my office desk. You see below the laptop with the bottom plate and battery removed, screwdrivers on the right, screwdriver set on the left, and battery above the screwdrivers. The coin between the battery and screwdrivers too has a role to play — it helps prise open the bottom plate.
After this, you see below the old WD Black 1 TB SSD in my hand, and the new WD Blue 2 TB SSD has been inserted in its socket in the laptop.
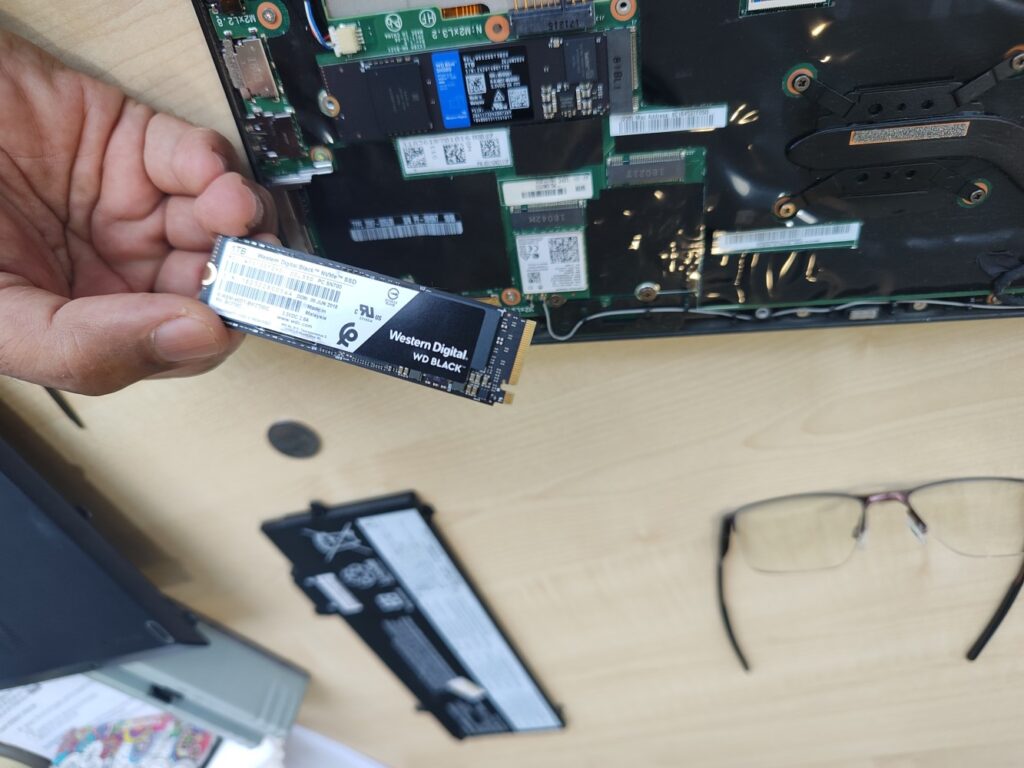
Below is a close-up of the WD Blue SN580 SSD in the laptop, all ready to be screwed down for (I hope!) five more years of faithful service.

Then it was a matter of fixing the battery back, then fixing the bottom plate, then turning the laptop the right way up, and booting it from a DVD drive to see if everything is fine. And it was! The 2 TB SSD showed up just like that, and I could move to the next step.
The software surgery
The next piece of the puzzle was to make the old 1 TB SSD accessible from my laptop. For that, I was prepared with this enclosure (from Amazon):
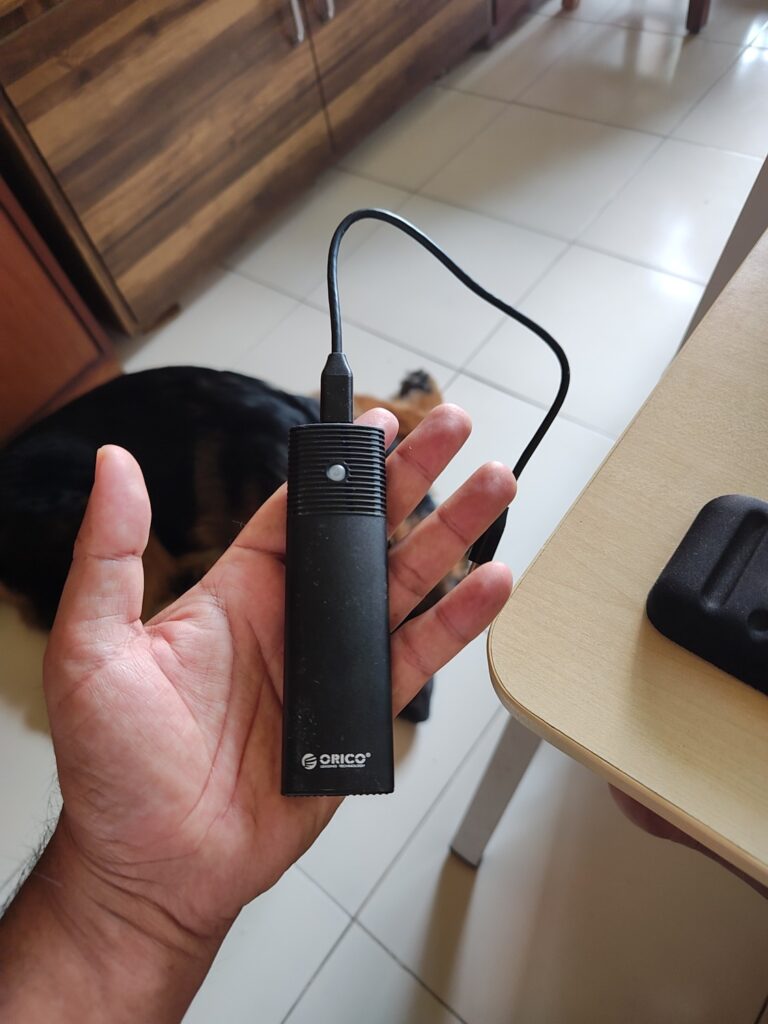
This now holds my old 1 TB SSD. I have another similar enclosure which I bought six years ago, to hold the original 512 GB SSD which Lenovo had supplied in my laptop.
Thus started The Great Ballet Of Software Restoration.
Restoring Windows from a system image
This part was straightforward. I booted my laptop from a Windows 10 DVD which I inserted into a USB DVD drive. Using this DVD, I booted into Windows, and a big button in the centre of the screen says “Install Windows”. I did not click that. On the bottom left was a link which said “Repair your computer”, which was the one for me. Then I plugged in my USB drive which had the system image, and clicked “Troubleshoot”, then “Advanced options”, and finally, “System Image Recovery”. That’s where Windows helpfully popped up a window saying that it had found my system image in my USB drive, would I like to recover from that? I said “Yes! Yes!”, and Windows did whatever it needed to do. After several minutes, my Windows partition was restored.
But…
Where did Grub come from?
It seems that when Windows created my system image on my backup drive, it replicated all my Windows partitions, plus the boot loader partition. Therefore, after system image recovery, my new 2 TB SSD had a boot loader partition which was trying to boot the way my old 1 TB SSD used to boot. That old SSD had been configured with a Linux partition and a Windows partition, and this new 2 TB SSD had no Linux partition. Yet, the Stage 1 of the Grub loader was loading (I can only imagine it was loading from the boot loader partition) and was giving me a “grub >” prompt, indicating deep confusion.
So I did a force-reboot into the BIOS boot menu, and discovered that this menu was showing me a Windows boot loader option too. This was great. I tried booting using this, which bypassed the confused “grub >” prompt and booted straight into my newly restored Windows 10 partition. This was a great relief. My Windows system image had been restored perfectly.
Now all I needed to do was increase the size of the Windows partition, which had been faithfully replicated as the original 100 GB, stretch the Windows file system to extend to this larger partition, and then I could boot Ubuntu and get on with the Linux install.
But when I tried looking at the partition table using the Windows Disk Management module, I discovered that just after my Windows partition of 100 GB, there was a Windows-RE recovery partition of 1 GB. And my Windows partition management software would not let me delete that partition, terming it a system partition. What a pain.
Windows partitions using Gparted
When nothing works, fall back on Linux.
I booted into Ubuntu using a USB flash drive (which takes ages to boot from), fired up GParted, and used it to knock out the pesky 1 GB Windows-RE partition. This Windows-RE thingie was a vestige left over from my old 1 TB SSD, which was going to be of no use in my newly set up system.
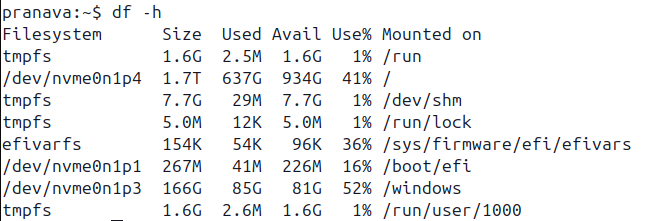
So I now had a 100 GB NTFS partition with a usable Windows 10 installation, and the rest of my (almost) 2 TB drive was unallocated space.
I booted back into Windows, and opened my Disk Management module there, and all was well. I extended the live Windows 10 partition. Windows asked me how much do I wish to extend the partition. I trustingly entered 175 GB. It accepted the value, extended the partition, and I quickly rebooted into Linux, wanting to get on with the job of Ubuntu installation. But to my dismay, I found that the Windows partition was now 282 GB, not 175 GB. I booted back into Windows, and shrank the Windows partition to 175 GB. I then discovered that the Windows UI is not very clear in distinguishing between “extending to” and “extending by”. I had thought that the UI meant “extend to 175 GB”, whereas it was “extending by” 175 GB, which meant that 100 GB was becoming 275 GB or thereabouts. Anyway, I managed to fix the error by shrinking the partition.
Another reboot, back to Linux.
The Ubuntu install
I now had about 1.8 TB of unallocated space to play with, and Ubuntu 24.04 LTS to install.
We come from old habits of server setups, where we always set up a separate root partition for / and additional partitions for the rest of the stuff, so that runaway log files or junk files in /var/tmp shouldn’t ever fill up the root file system and cause the system to become totally unmanageable. I had been using a separate 20 GB / for my desktop Linux till now, but that had proved to be a pain.
You see, once upon a time, I used to set up a / partition of 20 GB, a swap partition for the size of my RAM (which I still do) and a /warehouse for everything else. So, my /home used to become a softlink to /warehouse/home, my /usr/share used to be come a softlink to /warehouse/usr-share, my /var/tmp used to become a softlink to /warehouse/var-tmp/ and so on. Thus, my /warehouse used to span 75% of my laptop hard drive, and it held all the large directory trees which were not needed at stage-1 bootup.
Somewhere several years ago, that sort of thing began to throw up errors with some system software. It appears that a softlink is no longer good enough for His Majesty the System Software (various), and even mundane CUPS would throw up errors and complain. So I began doing a mount with the bind option, to remount /warehouse/usr-share onto /usr/share, and so on. I put in entries in /etc/fstab manually to do these remounts at bootup. That solved the problem, but it meant I was running with a hand-crafted /etc/fstab, which is a pain to copy and replicate every time you reinstall OS. And this hand-crafted fstab causes the Ubuntu automatic major-number-upgrade tool to fail.
So, this time, I threw caution and my server sysadmin mindset to the winds, and created just two Linux partitions, for / and swap. So, given my 16 GB laptop, I created a 15 GB swap partition, and the rest was just one big EXT4 file system for the entire everything else. No more remounts with bind, and no more worrying about softlinks.
I restored all my personal data from backups. Nothing to discuss there. Installed texlive, gimp, mkvtoolnix, audacity, handbrake, virtualbox, git, VS Code and all sorts of other stuff.
The Ubuntu install of course reinstalled a clean, fresh GRUB, so my boot loader problem disappeared too. I now get a boot menu showing me Ubuntu and the Windows boot loader, just like I’ve enjoyed for the last fifteen years, and everything works well.
Tailpiece: the USB SSD partitioning story
I now had a working laptop with the original Windows system exactly restored onto a larger partition, and a Linux system with a brand-new Ubuntu release and all my old data. And I had a new 1 TB USB SSD drive, in a smart black enclosure, which I wanted to get ready for use as a portable drive. Since both Linux and Windows works with NTFS, I wanted to make this a single NTFS file system spanning the full 1 TB.
I discovered something strange with this.
- Windows does not delete non-Windows partitions. If you have Linux partitions, you must boot into Linux and delete those partitions.
- Windows does not create a partition table if you’ve removed the partition table. There is perhaps a Windows tool which will create a new GPT partition table on a bare-metal drive which does not have one. I am not aware of it. What I tried was the Disk Management module of the Computer Management application in Windows, and that didn’t manage it.
So I booted into Linux, and used GParted to remove all the old partitions, and then I created a partition spanning the entire drive. I then used mkfs.ntfs /dev/sda1 to create a NTFS file system on this partition. That worked well, and I booted into Windows and checked the file system. All is well now.
Why?
Some people (the “senior” types) look at me pityingly, and ask me why I need to do all this myself. Isn’t it a waste of my valuable time? I let such comments pass. It is only by managing my own systems, however superficially, that I “keep my hand in” as they say, and in any case, I am too much of a geek to be happy with a system set up by some 22-year-old who has never typed a GRUB command at the prompt. Most 22-year-olds need to be told that laptops and servers all need swap space. Too tiring. Till perhaps 15 years back, we used to rebuild our Linux kernel from source after installing the OS, retaining just those drivers which we needed. So the modern era of Linux installs seems a breeze.
And what are we without our toys? Computers are toys and companions first, professional tools later.
Leave a Reply