

WARNING: this post is not philosophy, or business, or management, or strategy. This is pure geek stuff. If this sort of thing is not your cup of coffee, skip now. Yes, it’s ok if no one in my circles finds this post the least bit useful. 😀
Video files and me
I realised two decades back that VCDs (remember video CDs, anyone?) and DVDs do not last long — the discs can get damaged easily. So I started ripping the DVDs onto ISO files and storing them on computer hard drives, which are easier to protect. But ISO files are huge, and the videos are encoded in the MPEG 2 format, which usually has much less compression than modern codecs. MPEG 4, if done well, can encode in a much more compact file and retain the same video image quality — a 4.5GB ISO can be transcoded into an excellent H.264 video of 1GB. Plus, most of the DVDs came with 5.1 multi-channel audio, which is useless for me because I don’t like surround sound — I prefer two-channel audio. Therefore, I taught myself how to transcode the ISO from the DVD into H.264, pushing for higher quality of final output and running a slower transcoding algorithm to get the best video compression possible. And for the audio, my transcoding can downmix the 5.1 channels to two.
There is a second source of video files for me now. I have Dropbox, and all the videos I shoot using my cellphone come and show up in my Camera Uploads folder under Dropbox on my Linux laptop. All these are MP4 files, with minimal compression.
I’ll be happy to store many of them in my archives, but I’d love to reduce the space they eat up. A good, slow H.264 encode would shrink the size by at least a factor of two without any perceptible reduction of quality. But I can’t manually convert all of these MP4 files using a GUI application — that’s the kind of things clerks and automata do. I’d like to batch-process the whole lot with a shellscript, from the command line.
Video transcoding
What does video transcoding do? To understand this, one needs to understand what a video file, like an AVI or MP4 or (my favourite) MKV file contains.
These files can contain one or more video streams, one or more audio streams, one or more subtitle streams, all inside one file. A video stream is the stream of digital data which your media player or TV converts into the moving pictures you see in a movie. An audio stream is the digital data which your media player converts into the sound you get from the TV speakers. And subtitles are, well subtitles.
The real issue with getting large files vs small files of the same video image quality lies in the encoding algorithm used to encode the video data. An algorithm like MPEG2 has quite primitive ability to compress the image data while keeping the quality at a certain level. If you want really clean, smooth video images with the MPEG2 codec, you’ll need to live with fairly poor compression, i.e. fairly large file sizes. If you go to the more modern H.264 algorithm, it has a lot of new refinements which allows it to create a much smaller file with the same playback quality. And if you go to H.265, you get about half the file size of H.264 for the same video quality.
The price you pay is in the complexity of the encoding algorithm. It takes relatively slower processors less time to encode MPEG2, and a lot more computing power for H.264, and still more for H.265. But if you’re doing the encoding on your PC, you often have the luxury of letting the PC run all night, crunching your favourite video files painstakingly.
The term “transcoding” refers to “decoding” followed by “re-encoding in a different algorithm”. When I get my MPEG2 files from a DVD, I transcode them to H.264.
Who cares about transcoding? Well, the satellite TV services were the most excited about the best possible algorithms, because satellite bandwidth was so expensive. Today, the OTT streaming movie platforms and YouTube are very excited about better algorithms — they save server and bandwidth expenses. And people like me, who like to build a collection of their favourite videos, movies, documentaries, live concerts on their home NAS, like to save space.
I check what the input and output files actually contain by using mediainfo which I find invaluable for this purpose, whether it be a video or audio file. (Yes, I’m 100x more comfortable with command-line tools which output text on stdout than with GUI click-click stuff.)
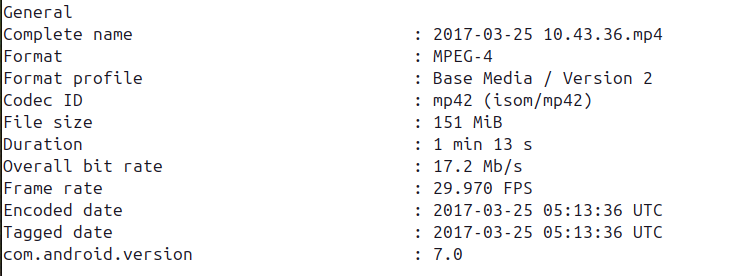
This is what mediainfo tells me about my input file which I’ve been playing with today:
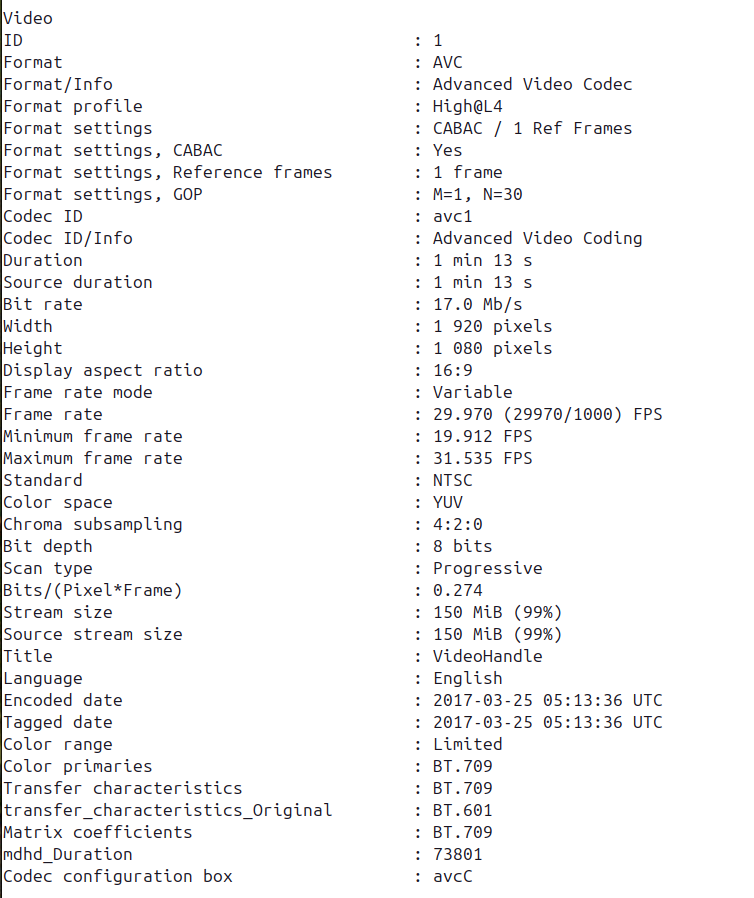
It then gives me more details about the video stream:
And then the audio stream:
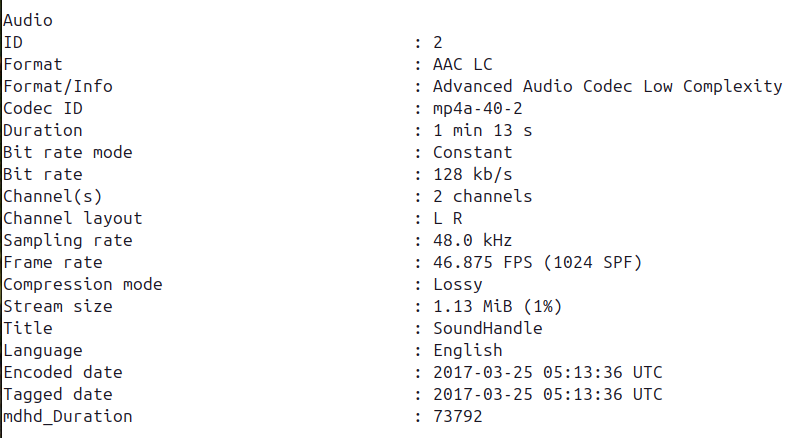
So, within the encapsulation of an MP4 file format, my video stream is encoded in AVC at 29.97 frames/sec and frame size of 1920×1080 (what they call “Full HD” in industry lingo) and my audio stream is encoded in 2-channel AAC at 48 Ksamp/sec.
Handbrake
After a few years of using the dvdrip program, I discovered Handbrake and have stuck with it for transcoding duty. And for the DVD ripping, I taught myself the esoterica of DeCSS, and then zeroed in on Brasero which does all the DVD decoding.
Handbrake works very well but it’s a GUI. It works beautifully if I lay hands on one or two DVDs every few months. It’s not amenable to shell-scripting. You can load a queue into Handbrake and let it crunch the video files all week, and it’ll do a splendid job, but it’s still no shellscript.
The ffmpeg option
So with my heart in my mouth, I approached the big daddy of command-line audio and video processing: ffmpeg. This program is famous for having a zillion arcane command-line options which intimidate beginners.
I found help on the Net, and here I am. To create H.264 of fairly high quality:
fmpeg -i INPUT.mp4 -c:v libx264 -preset slow -crf 22 \
-profile:v main -g 250 -pix_fmt yuv420p -acodec mp3 \
-ar 48000 -b:a 256k OUTPUT-h264.mkv
To create H.265 instead, this works:
ffmpeg -i INPUT.mp4 -c:v libx265 -preset slow -crf 22 \
-profile:v main -g 250 -pix_fmt yuv420p -acodec mp3 \
-ar 48000 -b:a 256k OUTPUT-h265.mkv
Some of the parameters are explained below:
-c:vspecifies the codec library to be used-presetspecifies how slowly the transcoding should do its job. A slower run will give a better image quality with other settings being the same. If one has patience, one can replaceslowwithslowerorveryslow-crfspecifies the Constant Rate Factor. A value of0means absolutely no compression and highest image quality, and a value of51means the maximum compression and the worst image quality. Values in the twenties give excellent videos generally.-acodec mp3specifies, in my case, that I want the audio track to be encoded in MP3 format-ar 48000specifies the audio sampling frequency per second, and48000generates excellent high quality audio for video watching
The screenshot of the three files below sums up my whole quest.

2017-03-25\ 10.43.36.mp4is the input file: 152 Mbytes.x2.mkvis the same content, with the same resolution, encoded in H.264, with CRF of 22. It’s 62 Mbytes.x2-h265.mkvis the same input, encoded in H.265, with CRF of 27. It’s 23 Mbytes.
So when 152 Mbytes of video generated by my phone converts to 62 Mbytes even with H.264, I’m very happy.
In between, I had tried H.265 with a CRF of 22, to match the H.264 CRF. That had given me a file of about 50 Mbytes. But dropping the quality a bit by setting CRF to 27 doesn’t seem to reduce the image quality perceptibly, at least with the quick-and-dirty cellphone videos I’m dealing with here. Maybe H.265 at CRF of 27 is equivalent to H.264 with CRF of 22, we’ll see.
Then there is always mkvmerge -o out.mkv in1.mkv + in2.mkv from the mkvtoolnix package to append a few videos into one file.
This page was very useful to get me started.
Things still pending
I still need to figure out:
- how to choose the two-channel audio track for the output, when the input has 5.1-ch and 2-ch streams
- How to choose English, German, and Hindi audio tracks and retain all of them in the output, when the input has multi-lingual audio tracks
- how to downmix 5.1-ch to 2-ch when the input has only 5.1-ch and I want only 2-ch in the output
- how to handle and carry forward subtitles if they exist in the input
Ah well, we’ll cross those bridges too someday.
Leave a Reply